Posts

Panel Installed!

Image
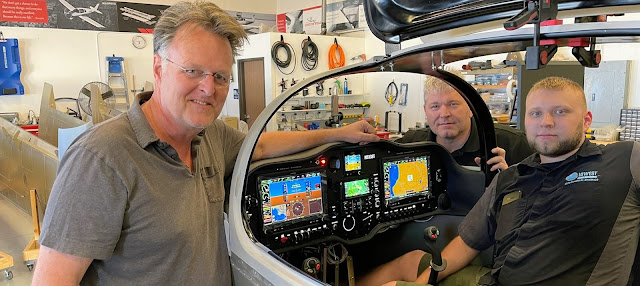
This week MidWestPanel (ie Steve and Adam, father and son) visited The Airplane Factory to install our panel. The panel has a custom layout, it is backlit, it hasVPX, recessed G5, Sirius XM, and lots of other custom features. We are really happy with the results. They did a great job. As you can see, behind the panel the is wiring complicated, so it took three days to install. Adam and Steve did all the work, while we supervised and made sure they got it right (;-). In the end it all went very smooth, and after testing there were only a few minor issues to be resolved.  The backlight looks awesome in the dark, it will be pleasure to fly this plane at night. Here Gustavo is inspecting the wiring harness. Nice work guys!
Fuel system

Image
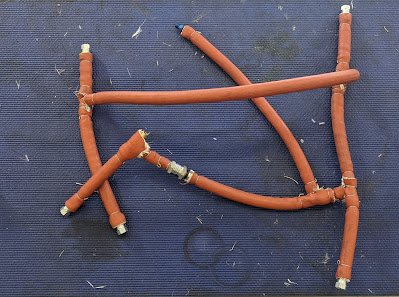
This week we assembled and installed the firewall-forward fuel lines. That was a lot of work, with a lot of gotchas. Each section requires several steps. The inner fuel line, the clamps on either end, the heat sleeve, and end-ties with metal wire. The correct layout is unclear from the diagram. Also the diagram uses subtle green/blue and dashed fuel lines to indicate different types of hoses. Note that there are THREE types of fuel hose that are used in the Sling TSI. It is easy to mixed them up (which we did several times) Blue lines - 3/8” J30R7 Blue dashed lines - 3/8” J30R7 return Green lines - 3/8” J30R9 Green dashed lines - 5/16” J30R9 Also there is a subtle difference in the check valves. Make sure you use the right one. Here are the tools we used: Anyway after a couple of days struggling with it, we got it installed. Thanks for all the help James. Finally it is installed. I hope there are no leaks!

Panel Update

Image
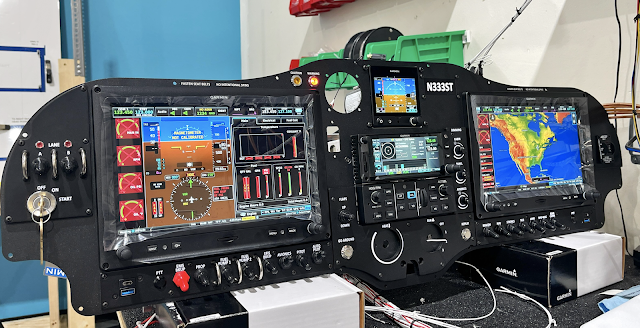
We received some more exciting pictures from MidWest Panel Builders on the progress of our panel for N333ST. The panel is powered up and fully lit! Hopefully we can install it in June. We worked closely with Steve to add several customizations that deviate from the standard panel layout. We opted for a full IFR capable panel with V-PX circuit breakers which eliminate the normal circuit breakers on the panel, creating more space and allowing for a clean and symmetrical layout. Note the backlight, it is custom made for the panel. We moved the switches so that aircraft controls are on the left and lights are on the right. This created enough space to move the USB ports to the bottom corners, so you can easily charge your ipad or phone. The G5 flight instrument backup is still prominent in the center, but it recessed with a simple bracket. Neat!  More notes on the panel design here . Can't wait to get it installed.

N333ST Panel

Image
Today Midwest Panel Builders sent us a picture of our new Panel. For context, Arthur and I are low-timer GA pilots (<500 hours) with Instrument rating. To come up with the Panel we wanted, we combined our limited experience or buttonology :) G1000 in C172 and C182, and lately, Cirrus Perspective, with, if you will, amateur ergonomics interests and OCDish about visual balance and rhythm. Midwest Panel Builders patiently hear our thoughts and pushed back when there were reasons why SMEs would compromise the safety, structural viability, and or functionality. We like the results very much! We started with the advanced IFR panel. Considered the 750xi (instead of the 650xi), but structurally speaking, it did not work. We decided to go old school Key to start the engine and redistributed electrical switches around. Also, worth mentioning, backlight is in there.  Here is an abbreviated list of things: VPX We decided on VPX (Vertical Power) that would create real estate eliminating circ...

Removable co-pilot stick (update)

Image
With help from my fried Jospeh Palmer I’ve completed the parts for the removable co-pilot stick. I want the stick to be easily removable, for the comfort of non-pilot passengers (ie my wife). To make it work I embedded an 8pin connector at the bottom of the stick (it is not wired up yet). You can remove and reinstall the stick in one motion, with one hand. There is a snap button that keeps it securely in place during flight. We used a lathe to make a few simple aluminum parts to hold the connectors halves inside to stick.  I was able to reuse the original parts from the quick build kit. Simply drill out the rivets that are holding the outer and inner aluminum tube in place, cut the inner tube near the bottom, install the connector parts, drill a few holes, insert the snap clip, and Bob’s your uncle. The parts Installed Removed Connector at the bottom of the stick Shitty schematic Here is the final result. Note that besides the small silver button it is hard to tell the difference. ...

333ST is starting to look like a real thing!

Image
This past week we made some excellent progress; we left the hangar with a strong sense of achievement. We mounted a few things on the Firewall:  Starter relay Battery holder Overflow Bottle for the ethylene glycol-based coolant Break System Fuse box Fuel Pump Intercooler Airfilter Oil Tank And the Rotax 915iS!!!

Customizations

Image
Before we started our build we selected  several custom options for our plane. Strangely enough, there is no list of all possible options. We just had to keep asking to find out (HINT: someone at TAF should make a list). Anyway here are a few options we selected as part of our order:  Split Rear Seat - This will allow for three passengers and luggage. We also plan to make the rear seat removable because we most often fly without any passengers and lots of luggage. Extra Long Seat Rails - My family is really tall, so we asked for extra long seat rails. This will allow them to move the seat back a few extra inches to accommodate for those long legs. Foot Pedals - The standard it comes with really cheap looking rudder bars. It turns out there is a option to get custom aluminum Sling branded pedals. They are on backorder. Besides the options from the factory, now that we are building we have learned about many small modifications that other builders are making. Here are some th...