Posts

Nylon Brake Lines

Image
During the built of N333ST we decided to upgrade the standard brakes to Matco brakes. I am not entirely sure why we decided to do this, but I think we believed that these brakes would provide superior braking power. In hindsight I now realize that the plane has plenty of stopping power using the standard brakes. Anyway, trouble started during flight testing. After 10 hours or so we noticed a brake fluid leaking from one of the brakes. A friendly mechanic fixed the leak by tightening the fittings that connect the nylon brake lines to the caliper. Unfortunately, the problem came back after we finished flight testing and had flown home. We assumed (incorrectly) that the nylon line was not fitted properly into the caliper, and the bent was causing a leak. To fix this I ordered a bunch of brake line parts online and tried to install a contraption to better line up the brake line with the fitting. Each time, this required bleeding the brakes, which in itself is a pain in the rear. Long stor...

Floor under Back Seat

Image
For some strange reason, there is no floor under the back seat. I guess Sling expects the back seat to cover any cold air leaks and stop stuff from falling into the space below. This seems really sub-optimal, dangerous, and needs to be addressed. Without a floor, the seat belt buckles can be pushed through the seat and fall into the space below which houses many important linkages that are needed to fly the plane, so that could be bad. Also there is a huge amount of cold air leaking into the cabin from underneath the seat. To fix this I decided to add aluminum floor panels under the rear seats, to close up the space. They are mounted with rivnuts, covered in carpet, and easily removed for inspection. The final result shown in the first picture.  It is an easy build; you need a rivnut tool, metal scissors , rubber mallet, and a few others. Measuring, fitting, and installing requires various advanced yoga poses, but it is doable. First I made a cardboard template for the two panels, ...

Prop Controller Failure

Image
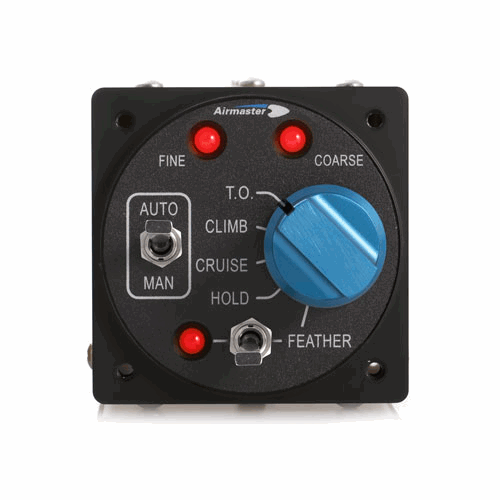
 On our way back from Oshkosh we experienced a prop controller failure. Three blinking red lights, which according to the documentation  indicates "Slipring Brush Worn Out". This had to happen at the worst possible time just as we were arriving at Wendover airport ( KENV ) which is at an altitude of 4200 feet and was reporting 45C.  I can't remember the exact density altitude, but it was definitely greater than 8000 feet. Luckily we had some intermittent manual control and we were able to get the prop into a position where we could continue to fly, keeping a close eye on the engine RPM, making sure not to overspeed it.  After refueling we departed using RW08 (10000'), and we were able gain altitude without any trouble. But during the climb out, to add insult to injury, the GTN650 decided to overheat and report a "Cooling Fan Failure". Luckily that cleared up as we got into higher and (slightly) colder air. Back in KPAO I emailed  Airmaster  in New Zealand. ...

External Static Air Intake

Image
When we finished the build of N333ST, the static air intake was located behind the panel. This has been so for all Slings built so far. However, as we have fixed some cabin air leaks the internal pressure has changed and the airspeed is now clearly reading too high by perhaps 20 knots. That is not a good situation.  So this week I returned to TAF in Torrance to install the newly released External Static Air intake kit. The kit consists of two external ports, some tubing, an intake switch that is mounted in the instrument panel, and some instructions. We were the first to install the kit. Shawn completed the installation in a few hours, and that same afternoon I performed a quick test flight with Jean. The airspeed was much more consistent, and noticeably lower than before.  However, the switch was not installed correctly. Switching to internal static air caused the airspeed to quickly drop. Jean quickly analyzed the problem, and the next day we hooked up the switch correctly. ...

Bay Tour

Image
Bay tour from KPAO via KOAK to the golden gate, then via KSFO to KSQL.

Fuel Leak, found and fixed

Image
A few weeks ago we noticed a strong fuel smell in the cockpit. We had smelled fuel before, but dismissed it. It was probably some fuel left in the fuel sampler that we keep in a side pocket.  Anyway, it was bad enough to investigate further. We took out the side panels off the center console and discovered a leaky fitting. It was on the back of the booster pump. It is not under high pressure, but it leaked anyway.    The leak was minor, and the source was hard to detect, but it was bad enough for some fuel to pool on the cockpit floor. The leaky fitting is in a very awkward place and we did not have the tools to fix. So we decided to cut off the existing crimp fittings with a diagonal cutter and replaced them with adjustable hose clamps that we can tighten with a screwdriver (see below). This MacGyver fix worked good enough to stop the worst of the leak.We were able to fly the plane back to TAF in Torrance, CA. They determined that the fuel pump had an incorrect fitting. ...

Pretty up the fuel stickers!

Image
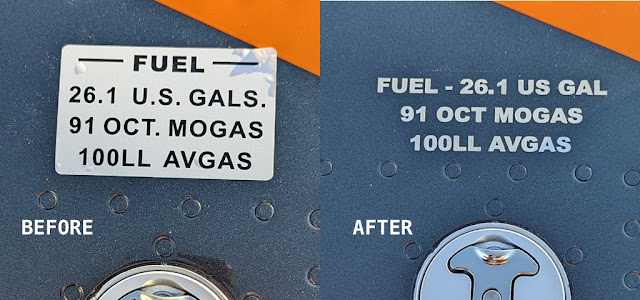
The standard fuel stickers for our Sling TSi are ugly, specially on a dark background. So I decide to replace them with custom lettering. Much better. Still legal, but prettier, and they've stayed on just fine. I ordered the new lettering for both tanks from letterring.com  for $52 (1.24"x3.72", gray, cast vinyl, cut out and removed). You can customize it any way you like.